
DIY Water Nail decals Review - Lifestyle Post sponsored
12/30/2013
Do you admire people with really kawaii nails? Lazy to pop by the nail salon or simply have no time for it? Why not try out this easy to do nail decal? It is not as difficult as you think it is and it can be done at the comfort of your own cozy home.
This is going to be a very short and sweet post on how to beautify your nails with DIY water Nail decals.
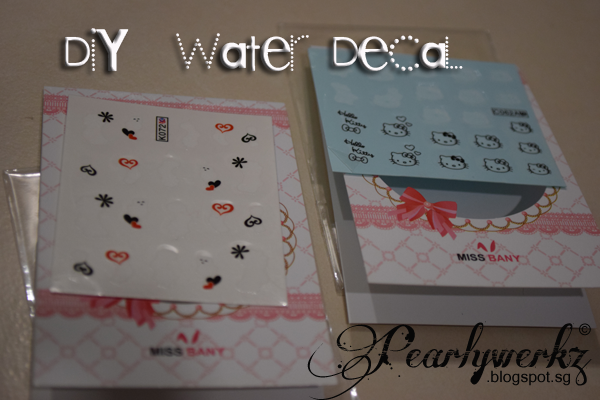
These were the 2 designs that i was given. I was quite blessed to received the Hello Kitty and the cat decals. The cat decals was more like floral decals with hearts and it was difficult to see the design. You can place it directly under the light for clarity.
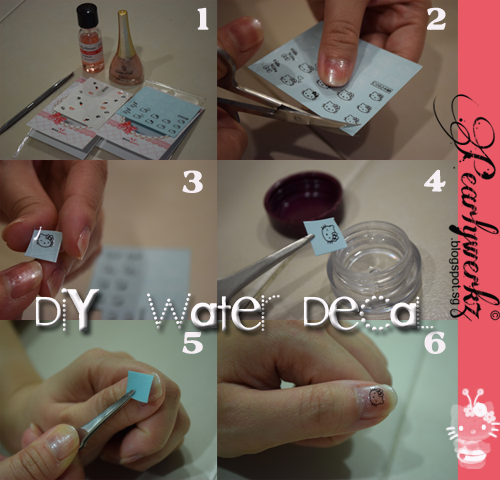 Follow these easy steps to put on the DIY Water Nail Decal. It is really quick and fuss free.
Apply a base coat colour of your choice and cut out the desired design, next soak it in some water for 2-3 seconds and place it on your nail with the image facing down. Apply another layer of top coat and you are done! For better precision, make use of a pair of tweezers to do the placement like how I did it.

This heart shaped design is from the cat decals but i could only see a heart with some white background.

This is the actual design after i have placed it on my nail. Noticed that it goes a little way off, do not press down. Use your tweezers to adjust it gently, so as not to break your DIY Water Nail decals.

Tada! Both nails done! Arn't they looking pretty? They are really quick and easy to put on. Remember to paint a top transparent coat over to protect these Nail decals so they will last longer. I love how easily I can DIY my nails with simple decals like this. Try it!
This is going to be a very short and sweet post on how to beautify your nails with DIY water Nail decals.

These were the 2 designs that i was given. I was quite blessed to received the Hello Kitty and the cat decals. The cat decals was more like floral decals with hearts and it was difficult to see the design. You can place it directly under the light for clarity.
 Follow these easy steps to put on the DIY Water Nail Decal. It is really quick and fuss free.
Apply a base coat colour of your choice and cut out the desired design, next soak it in some water for 2-3 seconds and place it on your nail with the image facing down. Apply another layer of top coat and you are done! For better precision, make use of a pair of tweezers to do the placement like how I did it.

This heart shaped design is from the cat decals but i could only see a heart with some white background.
This is the actual design after i have placed it on my nail. Noticed that it goes a little way off, do not press down. Use your tweezers to adjust it gently, so as not to break your DIY Water Nail decals.
Tada! Both nails done! Arn't they looking pretty? They are really quick and easy to put on. Remember to paint a top transparent coat over to protect these Nail decals so they will last longer. I love how easily I can DIY my nails with simple decals like this. Try it!


0 comments